How to Resize an Image
April 17
11 min. to read
Every photographer will encounter a time when they need to resize a picture. Sometimes a photo has to be a certain size in order to look good on a website or in print. There are different tools that you can use to resize photos quickly and easily. For example, Luminar Neo resizes pictures in only a few clicks, offering different size ratios and even a crop tool that lets you immediately resize pictures for particular uses, for example as a Facebook cover. Why not try Luminar Neo now?
Reasons for resizing
Size issues
One of the biggest issues with large photos is size. The larger the photo, the larger the file size. Sometimes you need to resize a photo to make it significantly smaller so it occupies less space and is easier to handle.
Fitting on a blog or website
Some websites and blogs require specific photo sizes. You can check online for the specific sizes of photos for different social media platforms and learn how to resize photos specifically for them. For example, the optimal Instagram photo is square. Learn to resize photos for Facebook with this helpful article. Always test how your photos will look before uploading them, especially to your portfolio website.
Speed
Smaller photos upload faster. If you need to upload a significant number of photos to a website, photo sharing storage, or the cloud, you’ll see that reducing the size will speed up the process significantly.
Printing
Some photos won’t look good when printed out at their original size. If you make custom photo albums for weddings or print portraits of clients to be hung on walls, learn how to resize images to make sure they look stunning in this format too.
What is resolution?
When we talk about resizing, people typically have questions about resolution. What does resolution mean and what does it have to do with resizing photos? An image viewed on-screen and in print will be of different sizes because of the resolution of the image. Understanding how resolution works can help you realize which settings to change when you resize an image.
Screen size
When you buy a monitor, you’re probably aware of the resolution of the screen. Screen resolution means how many pixels a monitor can display. A pixel is the smallest component of your image that contains a single color. A monitor with a screen resolution of 1280×800 pixels displays 1280 pixels along the X axis and 800 pixels along the Y axis. The higher the resolution, the more pixels an image contains, making it more detailed and the color gradients smoother.
For Windows, you can check the resolution of your screen by going to Start > Control Panel > Display > Settings. For Mac, choose System Preferences > Displays and select Resolution: Scaled. It will show the default resolution of your screen.
Image size on-screen
Images are of a fixed pixel size when they appear on your display. Your display resolution determines how large the image appears on-screen. A display with a lower resolution displays fewer pixels than one with a higher resolution. Each pixel of a lower-resolution display is larger than each pixel of a higher-resolution display of the same physical size. Therefore, how you resize photos also depends on the resolution of your display.
Image sizes in print
The physical size of an image and its resolution determine the amount of data in the image and its print quality. In general, higher resolution images print at a higher quality.
Common sizes for photos
Learn how to resize pictures for printing. Consult the list below for standard sizes of photos in pixels. Resize an image to these dimensions according to your purpose.
- 320 x 240
- 640 x 480
- 800 x 600
- 1024 x 768
- 1280 x 1024
Quick guide on how to resize an image
What’s the best photo editing software for resizing pictures? What’s the best way to resize images?
Preview
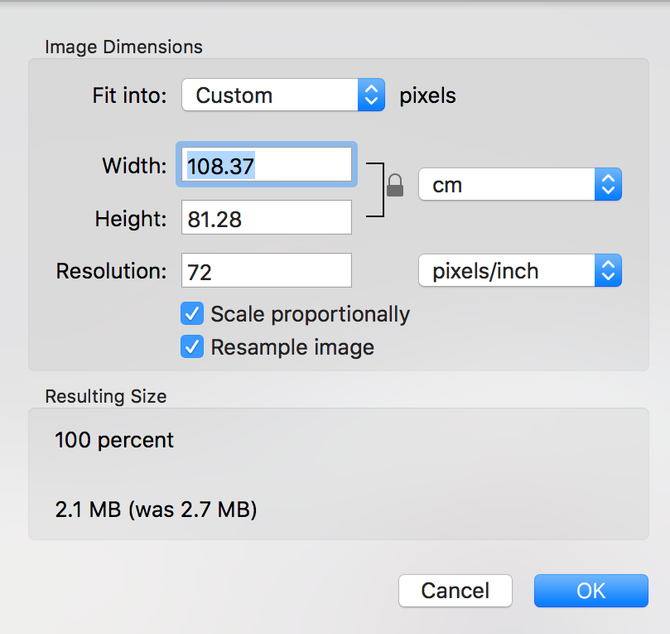
Let’s find out how to resize an image in Mac’s Preview.
- Open your file in Preview.
- In the Tools menu, select Adjust Size.
- Just like in the box below, you’ll see the width and height of the image. Make sure to check the box next to Scale Proportionally and Resample Image.
- Change the width or the height to the dimension you need. The other dimension will change proportionally.
- When you’re done, click OK.
Photoshop
How can you resize images in Photoshop?
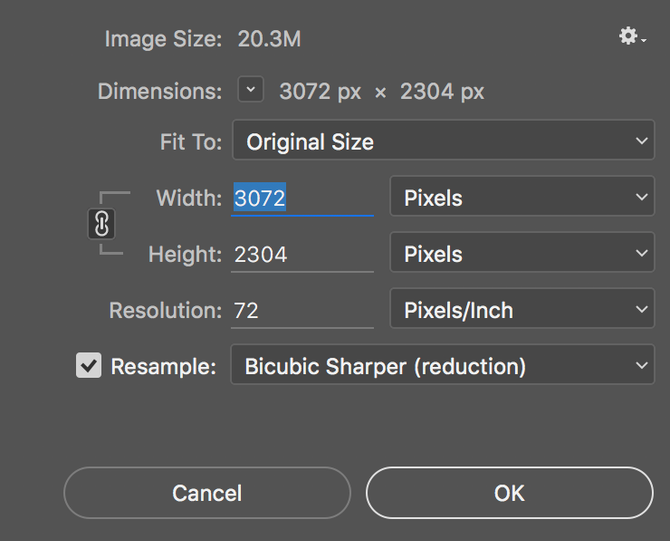
- Open Photoshop, go to File > Open and select an image.
- Go to Image > Image Size.
- An Image Size dialog box will appear (like the one pictured below).
- Enter new pixel dimensions, document size, or resolution.
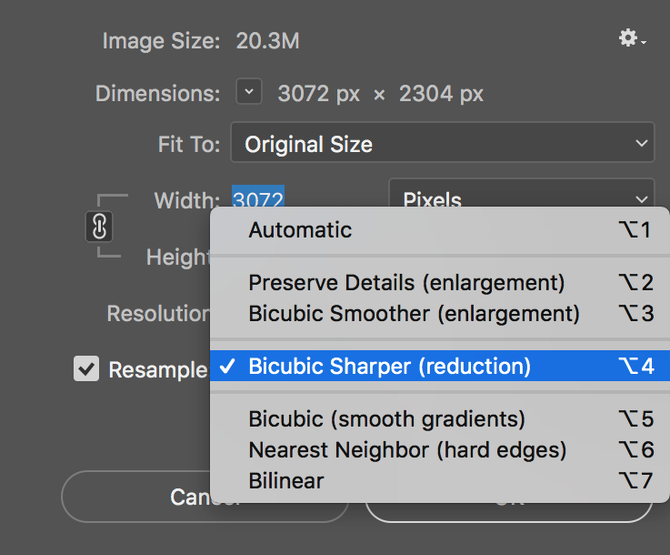
- Before hitting OK to resize, you can also select the resampling method.
Bicubic (best for smooth gradients) calculates the averages of surrounding pixels.
Bicubic Sharper works best when reducing images while keeping details sharp. If an image appears too sharp, Bicubic is recommended.
Lightroom
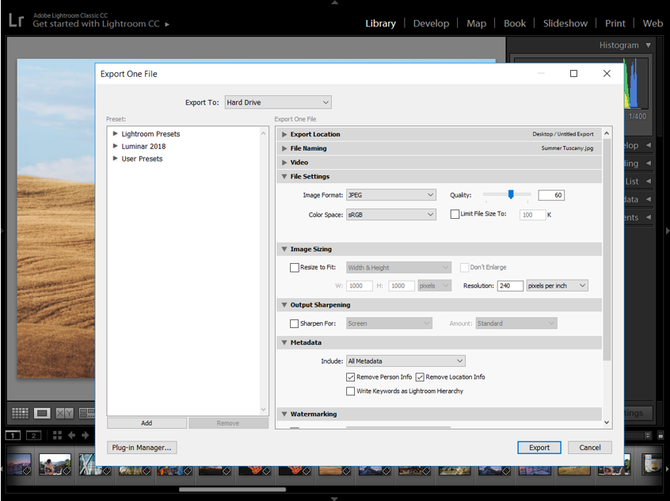
Resizing images in Lightroom isn’t very intuitive. To resize images, follow the steps below.
- Finish all your editing on the picture until you’re satisfied with the result.
- Click File > Export.
- A dialog box like the one below will open.
- Scroll down to Image Sizing and input the dimensions you need.
- Save your image by clicking Export.
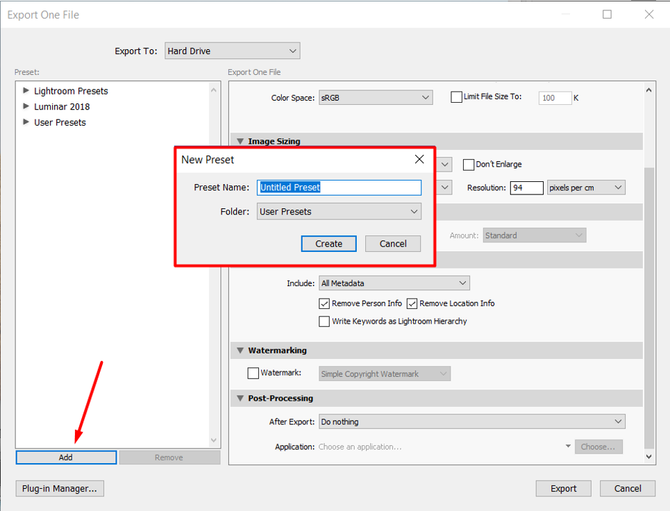
 In Lightroom, you can create a custom preset of your preferred size. In order to do this, set the image size you want, then click the Add button below. A dialog box will appear allowing you to name your preset for future use.
Luminar Neo
Resizing images in Luminar Neo is the quickest, most clutter-free way that doesn’t compromise on options.
Here are some helpful instructions on how to resize an image in Luminar Neo:
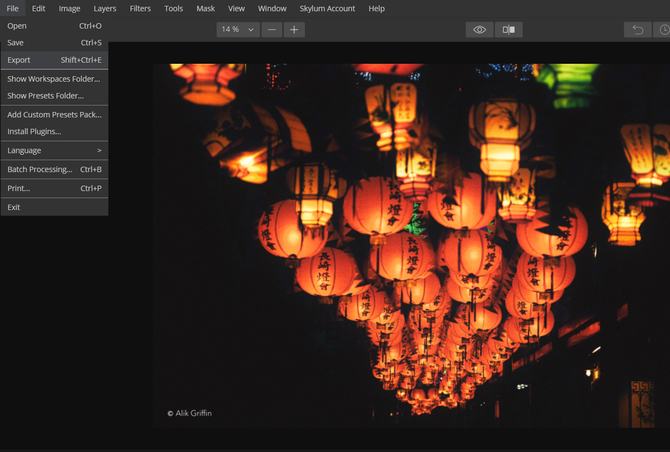
- Open a photo in Luminar Neo.
- Go to File > Export.
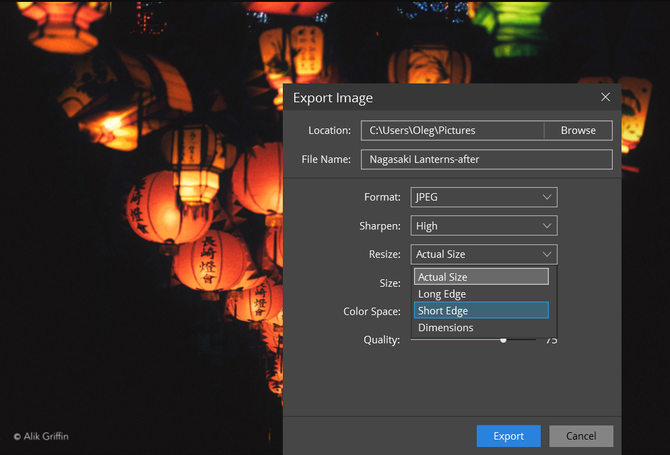
- There are three options for how to resize an image.
 Select Long Edge if you want to fix the dimensions of the longer side. Input the number of pixels you want on the long edge and the short edge will be resized proportionally.
Select Short Edge if you want to fix the dimensions of the shorter side. Input the number of pixels you want on the short side and the long side will be resized proportionally. Both long edge and short edge resizing can be used regardless of whether the image is horizontal or vertical.
Select Dimensions to input measurements for both the long edge and short edge and the image will be resized accordingly.
Optionally, in the same box you can also:
- Change the color profile (sRGB, Adobe RGB, ProPhoto RGB)
- Change the format (JPEG, PNG, TIFF, etc.)
- Change the name and export location
- Change the quality of the image (Going below 50% will significantly decrease the quality but will reduce the size.)
- Export the image. Save it in a different location or change the name if you don’t want to overwrite the existing image.
And, finally:
We hope this guide was helpful and that you’ve learned how to resize an image. Even though various pieces of software offer this basic functionality, it’s important to choose software that simplifies your workflow and offers the best way to resize images. That includes having the features that you need while being clutter-free and easy to use. Luminar Neo has all the necessary functionality and an intuitive, friendly user interface that can help even beginners get oriented quickly. After all, software should be a time-saving helper for you, not a complicated puzzle.
Click the button below to try Luminar Neo and learn how to resize pictures quickly and effectively.